
How I Transformed my Neglected Side Yard with a Few Simple Steps
It is not uncommon when you find yourself neglecting a side yard, especially when you hardly spend any time in this space, other than the typical lawn maintenance. I found our side yard to be a major pain where even a simple thing like mowing felt like a chore, so I knew I had to make a change. In this article I will walk you through the steps I took to transform our neglected side yard into a clean, attractive foundation planting that not only looks nice but has made mowing my lawn far more enjoyable.
The Forgotten Side Yard
Ever take a walk through your neighborhood and notice how each house lines the street, evenly spaced and usually centered neatly on its own lot? Each with its own personality, some featuring simple landscaping with just a tree or two, while others show off a lush front garden meant to be admired, or even a cozy seating area.
But have you noticed the one thing almost all of these homes share? Those darn narrow side yards, often bare and boring with nothing to show for them. Because why would you pay attention to this part of your yard, when all it has been so far is a way to access the other side of your house?
Many homeowners use these side yards as a place to tuck things away, whether that be stacked firewood, yard waste bins, or perhaps a small utility shed hidden from view. Rarely do these spaces get the same attention as the backyard, or even the front yard for that matter. And yet, it raises an interesting question: why do we seem to neglect this space instead of turning it into something more enjoyable?
I came into this realization shortly after moving into our home, that our side yard was just like many others, a neglected wasteland. There is absolutely nothing, no landscaping, no personality – just bare.
This was our first place with a yard too, and I was so excited for some reason (don’t ask) to mow the lawn. I haven’t had to mow a lawn since I was a teenager! Soon after venturing over to this side of the house to begin mowing, it quickly turned into frustration. I hated having to get so close to the side of the house and around the utilities. Why were there no rocks? Why just allow the grass to grow freely wherever it would allow?
Okay, I’m being dramatic – but truthfully it was a neglected space that wasn’t well kept. So much so that… and I will never forget this, where I had been mowing some taller grass along the foundation, where the earth dipped in deeper (because this side of the house had no gutter so when it would rain it would pour off the roof onto the side of the house creating a divot) and there was a snake! I never considered myself someone to be startled by a snake necessarily, but it happened to be in this grassy divot and it hadn’t responded the way I would have thought – it was coming at me and fast, slithering its way toward my lawn mower, which seems like a stupid idea to me now but it worked because I quickly let go and ran the other way, haha.
Anyway, I had to make a change and I knew I wanted to create a plan to landscape the side of our house just enough so that I could easily mow without all of these obstacles – and if there happened to be any snakes, they would likely remain near the house within my future garden, leaving me to my lawn maintenance and them freely napping under a shrub, or whatever they like to do.
Step 1: Assessing the Challenges
Every new project should begin with a clear understanding of the space you’re working with and the goals you hope to achieve. Taking a little extra time to think through the challenges you’re facing—often the very reason the project began in the first place—and envisioning the desired end result can make the entire process move along much more smoothly.
Below I will walk you through my own personal experience when beginning my DIY project, adding a simple garden to our side yard.
Current Conditions & Pain Points
Until you live in a place for more than a year, you really never know the amount of sun you are working with.
Gardener’s Tip: The location of the sun shifts from winter to summer, so it is always a good idea to clock the sun during the growing season and at least 3x throughout the day from morning, midday, and late afternoon – for maximum sun exposure you could consider doing this activity during summer solstice, to gain the best assessment of your light conditions – however any time during the summer season should give you a fairly good idea what you are working with.
Shade:
This side yard faces the east, so it receives morning sun for a few hours before it reaches higher into the sky and dips behind the tall trees in our backyard – and eventually our house.
For the rest of the day the area remains shaded for the most part, so I knew my focus had to be shade tolerant plants if I wanted anything to thrive along the foundation of our house.
Hardiness Zone:
Not only do the plants I choose need to handle low light conditions, but they also need to withstand our cold Minnesota winters. We live in the USDA hardiness zone 4b, which means our coldest typical temperature could dip between -25 to -20 degrees Fahrenheit, so our plants must be cold-hardy to survive the season.
Soil Condition:
It is always a good idea to understand the type of soil you will be working with so you can gauge how well plants will grow in the spot you place them. It could be as simple as digging up some dirt and adding it to a jar of water like I did. Once the dirt has time to settle it will show you the layers found in your soil such as, sand, silt and clay. I had a fairly equal mix of silt with sand and surprisingly not as much clay as I expected.
Gardener’s Tip: When you have the perfect balance of all three, you end up with what’s known as loam. This ideal soil condition supports healthy plant growth by offering excellent drainage and aeration, creating the perfect environment for roots to develop.
Once you understand the quality of your soil, you can test its pH using the water from your jar with an at-home kit, which is widely available online. For a more detailed analysis, you can also send a soil sample to be tested through your local extension office, university soil labs, or private labs found online. I started with an at-home kit from Rapitest, but later chose to mail in a sample for a more thorough evaluation. This process revealed that our soil is slightly alkaline, helping me better understand how to amend it based on the plants I choose.
Maintenance:
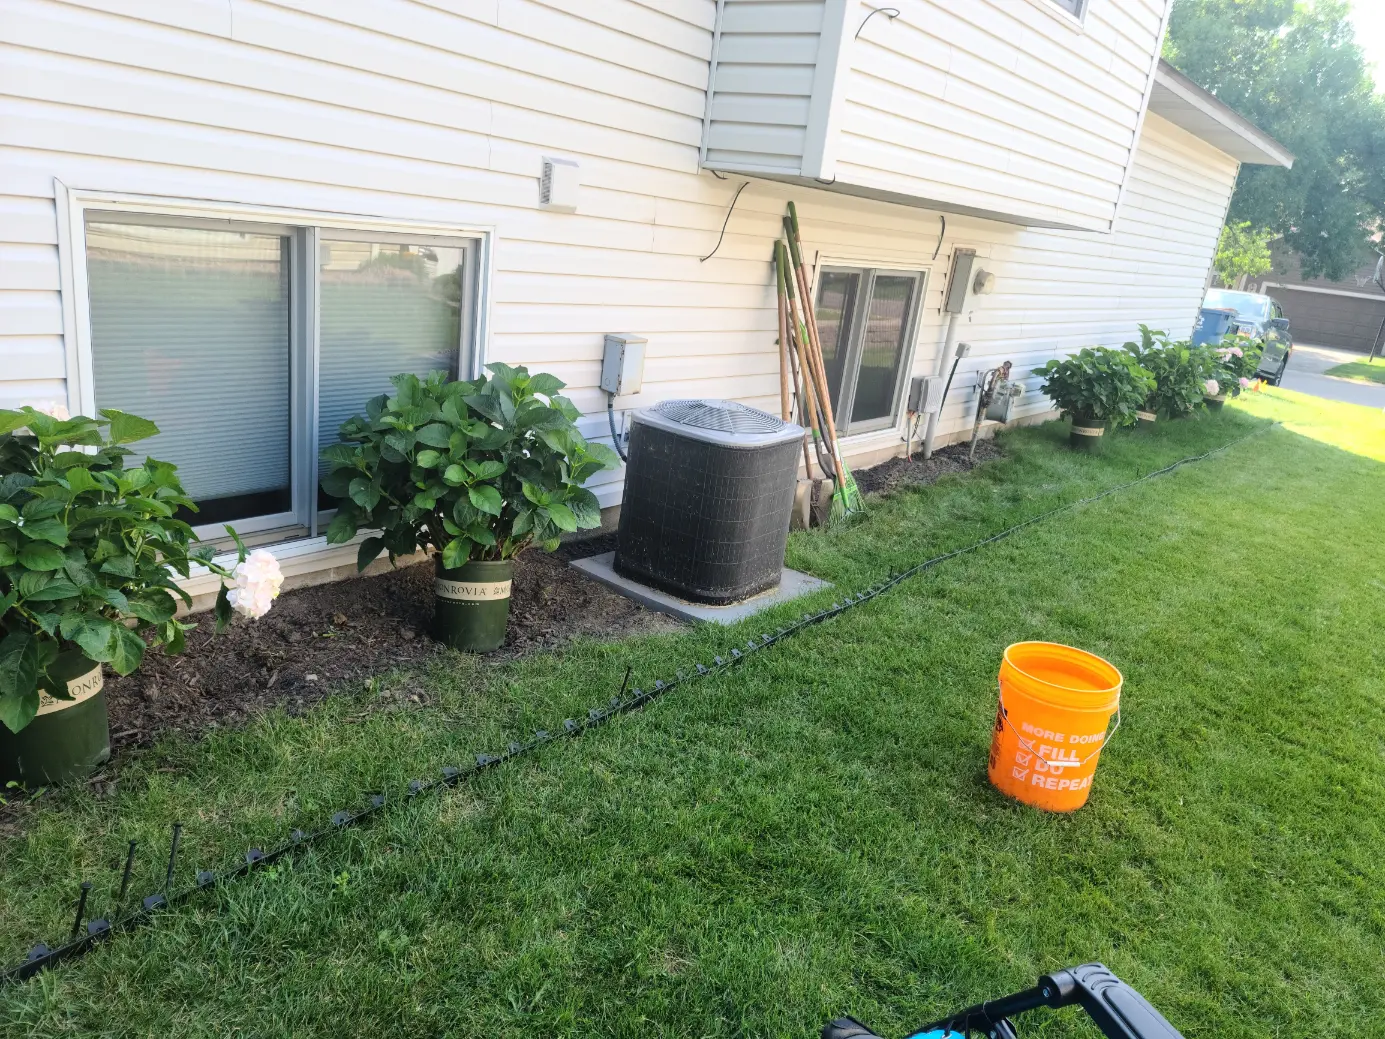
Besides the environmental conditions of our side yard, as I had expressed above, I highly disliked the difficulty in lawn maintenance. Mowing on this side of our house was a challenge due to heaps of gravel against the foundation. I think the purpose of this might have been to keep the grass from growing too close, however the result was a mix of grass and rocks instead.
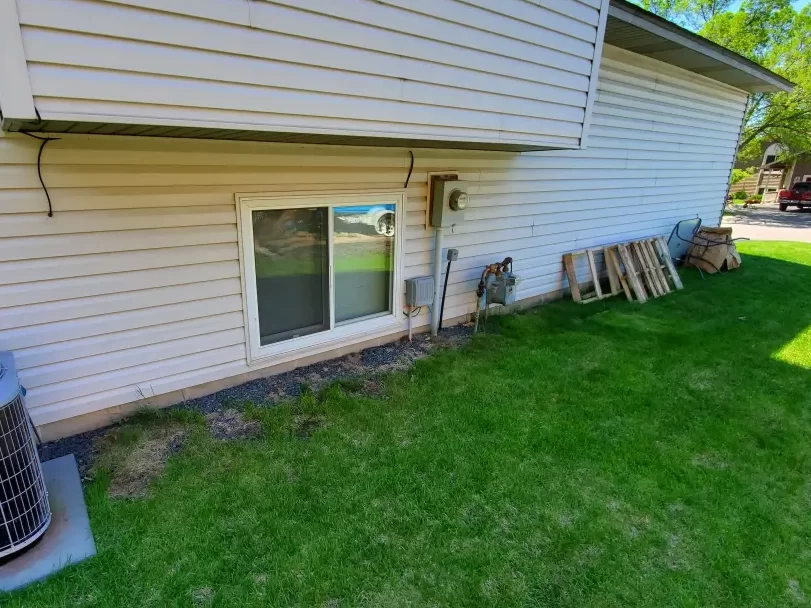
This was a pain not only because I didn’t want to shoot rocks out while mowing over this section, it was difficult getting close to the house to cut the overgrown grass. I knew this needed to be taken care of, so choosing to landscape the side of our house was a must.
Defining My Goals:
Once I was aware of the challenges I was facing with my side yard, I thought about what I could do to solve these so this space would become something I could enjoy instead of dread.
Easy Lawn Maintenance:
I knew the first thing was to remove all the gravel against the foundation. By getting rid of all the rocks, I would improve my lawn maintenance drastically as there would be no more rocks shooting out from beneath my lawn mower.
However, I needed to add a garden to the side of my house so that I no longer had to cut the grass so close to the foundation.
Visual Interest:
Not only would a garden help with ease of lawn maintenance, it will add visual interest to our home’s landscape.
Care Free Plants:
Keeping in mind that we won’t be spending much time in this side yard and the choice to landscape is purely for aesthetic reasons, I want to be sure to choose low-maintenance plants.
The Design Concept
When I began thinking about how to landscape our home, I first had to understand what I was working with and what I wanted to achieve, which I shared earlier. Once these pieces of the process were clear to me, I was able to narrow down my plant choices that should work for my garden.
Gardener’s Tip: Understanding your site conditions and goals are the first steps you should take when making your landscape design plan.
Selecting the Right Plant:
I was new to landscaping when I designed this garden bed and at the time I had limited plant knowledge, and my options seemed vast. Of course I was able to narrow them down for the space that only received part shade, however part of our side yard did include afternoon sun as well.
When I realized that I could include a plant that would receive more sun I instantly looked into lilacs. I always love the fragrance these plants give so it has been a goal of mine to have one in my yard one day, this was the perfect time.
The Focal Point:
I still didn’t have a ton of space, and I read that lilacs can get rather big so I started researching dwarf varieties, which is when I discovered the ‘Dwarf Korean Lilac Tree’ (Syringa meyeri ‘Palibin’).
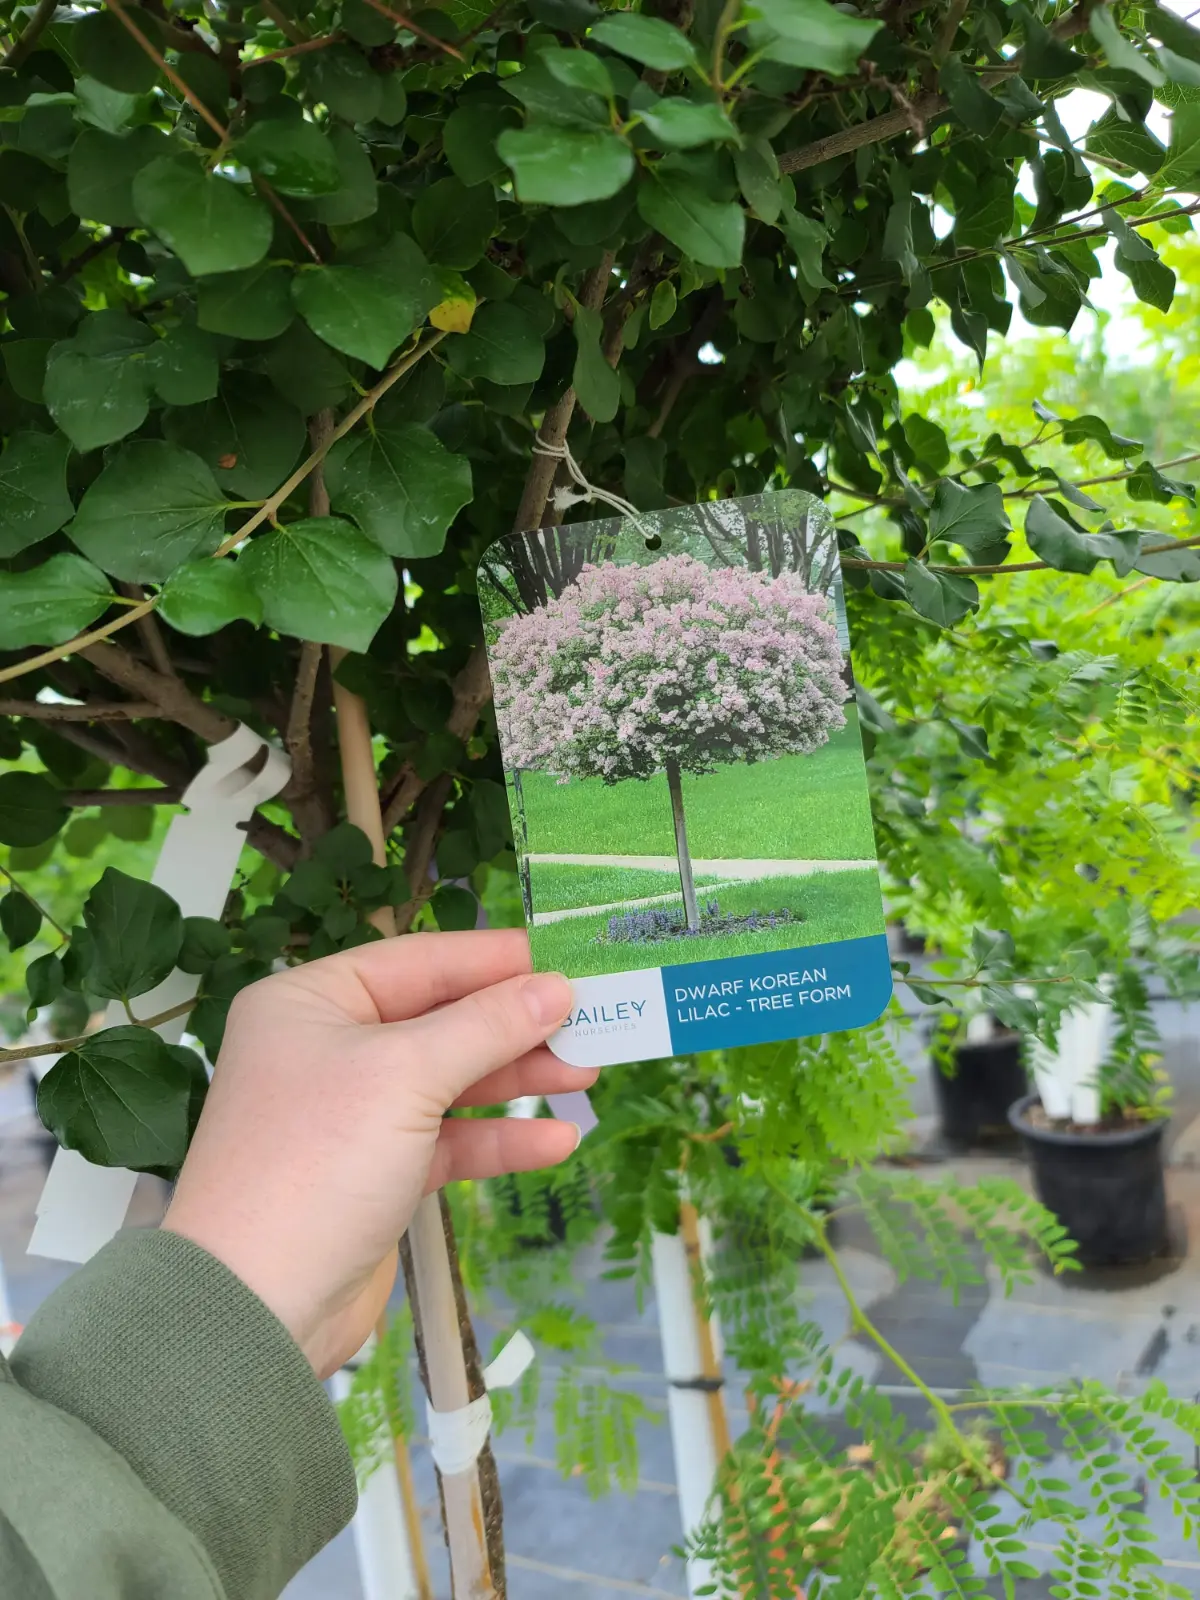
This is a smaller tree that I thought would make a perfect focal point to our side garden. It should get no more than 6 feet wide at maturity, and roughly the same height, if not a little taller – I knew it would fit this space well and provide us with an amazing smell in the spring with beautiful light purple flowers.
Gardener’s Tip: You can always choose a plant that may grow slightly larger than you would like, by continuing to prune it down to maintain the ideal size. Keeping in mind, this increases your level of maintenance required.
Seasonal Interest:
Knowing that lilacs unfortunately do not last the entire season, and this variety would begin to fade as summer approaches, I wanted to continue showing seasonal interest in my garden, so I had my next plant choice had to be something that would bloom after my lilac blooms faded.
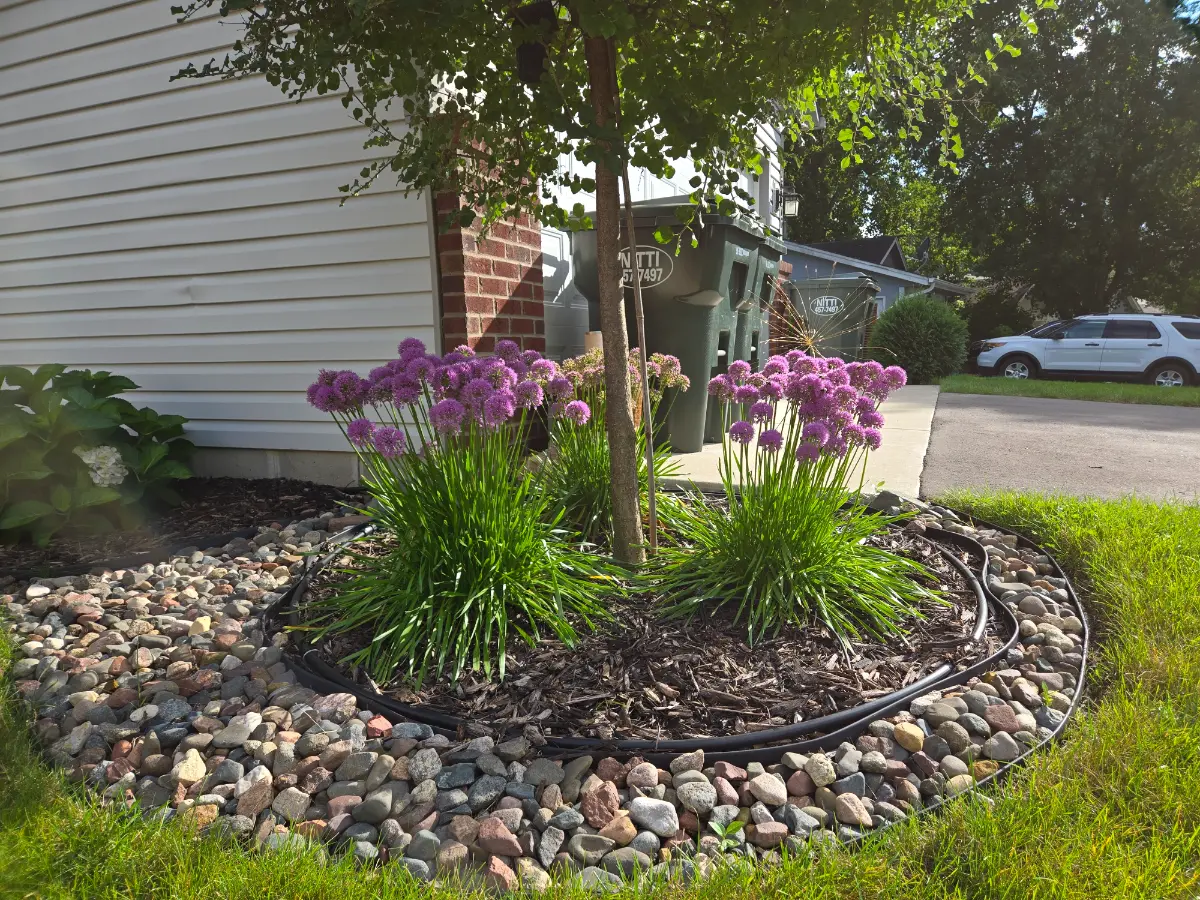
This is when I discovered ornamental alliums while watching garden videos on YouTube. These flowers are so cool with their upright shape and bursts of purple flowers, which remind me of dandelions before they complete their lifecycle.
The alliums I ended up planting are known as ‘Serendipity’. I liked this variety because they would not grow too large beneath the lilac tree, and they have a compact growth habit. Besides, the bees are obsessed with these flowers, which always makes me happy to provide nourishment to our pollinators.
Texture:
Now that I’ve covered the focal point and added some seasonal interest to my garden, my next plant choice must tolerate plenty of shade as this space only receives a few hours of morning sun. However, I also want this plant to have some texture to provide plenty of interest for aesthetics.
I may have been new to gardening, but one plant that I heard of often was the hydrangea. You can find these planted in the landscapes of people’s homes all over Minnesota, and they make excellent shade tolerant plants. This was a good indicator that these plants did well in our climate, and even better, they are beautiful with blooms that last a good portion of the season.
Gardener’s Tip: Hydrangeas offer several types, and some do enjoy more sun than others – such as Panicle Hydrangea (Hydrangea paniculata), whereas the shade tolerant types I would consider for my shade garden will be the Bigleaf Hydrangea (Hydrangea macrophylla) or Smooth Hydrangea (Hydrangea arborescens).
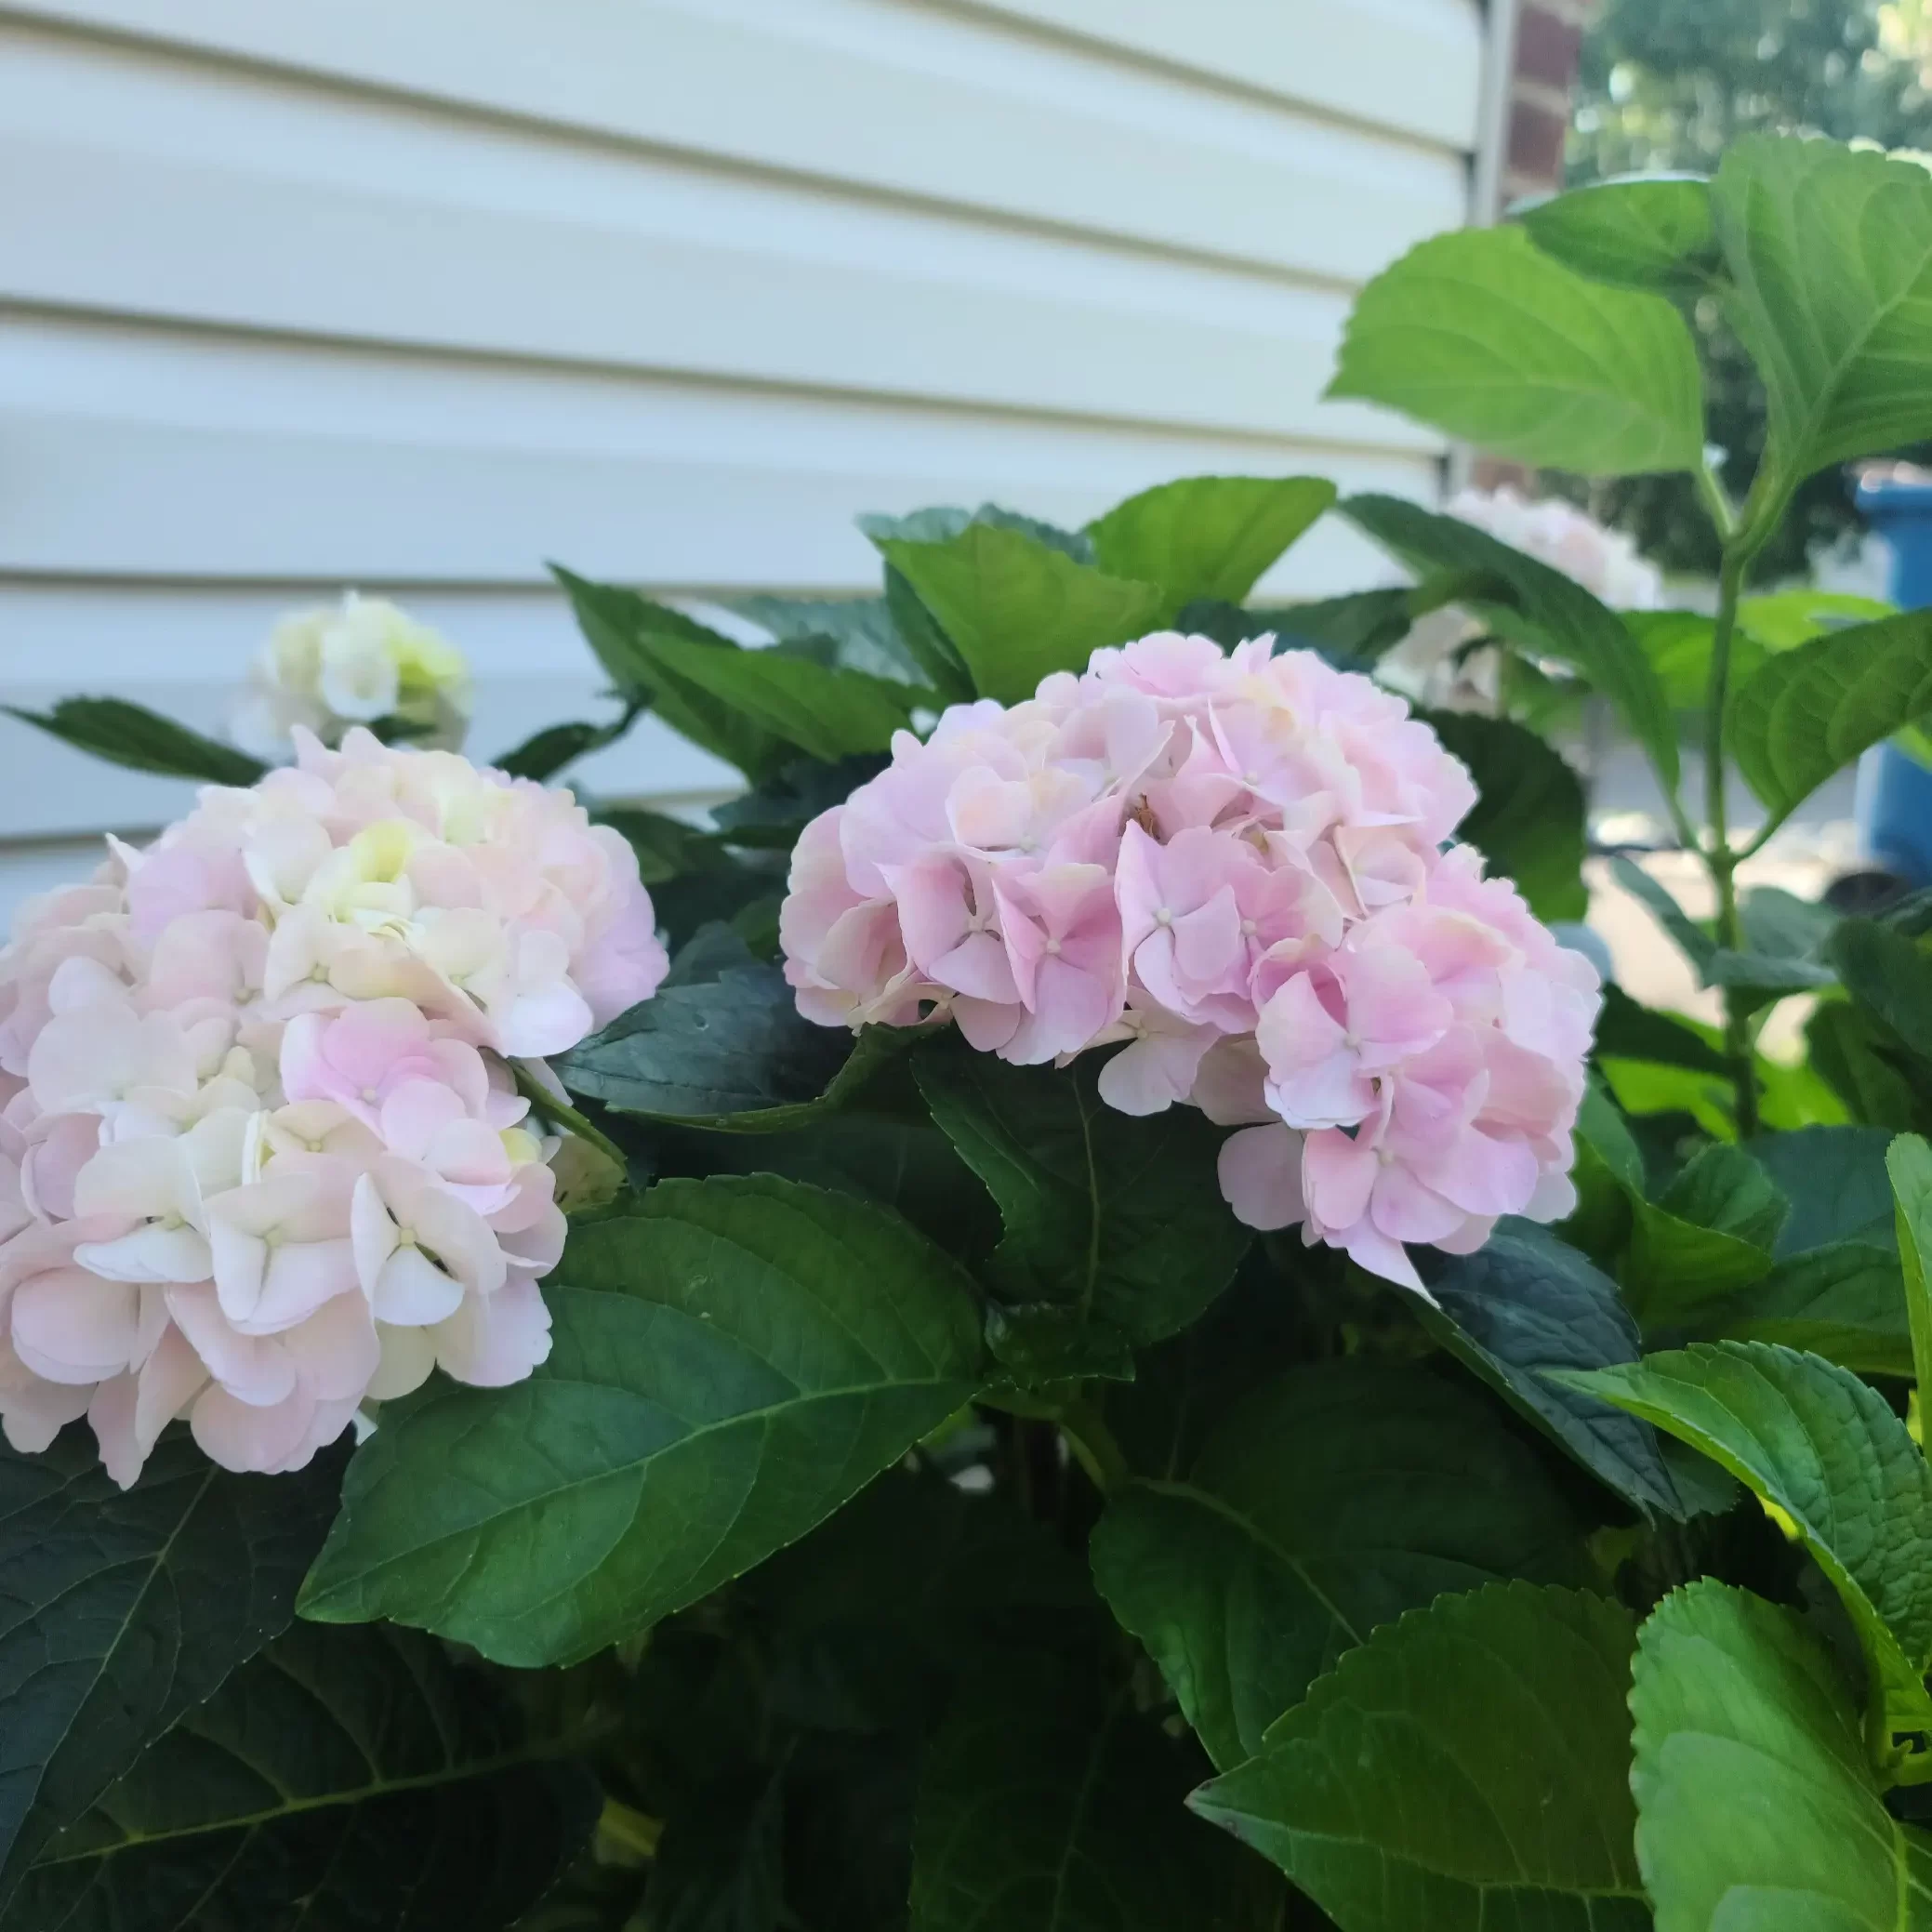
When visiting my local nursery, I came across a unique hydrangea I have not seen before. The foliage was such a deep green with incredibly healthy looking leaves with serrated edges that caught my attention. However it was the large blooms that sold me, and I knew I had to include this in my landscape.
I chose the ‘Seaside Serenade Cape Lookout’ (Hydrangea macrophylla ‘HORTMABLO’) for my shade garden because it is an incredibly beautiful shrub that provides both structure and long-lasting visual interest. Its soft pink, almost champagne-colored blooms begin in the summer and continue into fall, allowing the shade garden to remain visually stunning throughout the entire season.
Other Garden Elements:
After making my plant selections, I needed to decide what type of mulch to use in my garden. During my research I learned that spreading rocks around the base of a plant creates a lot of heat against the root zone. Because the majority of my plant choices have a shallow spreading growth habit, I knew I couldn’t use just this and would need to include something more plant friendly as well.
The Value of Rocks:
I love the look of river rock and knew from the beginning that I wanted to incorporate it as a hardscape element in my landscape design, not only for its aesthetic appeal but also for its longevity. Unlike wood mulch, rock does not decompose over time, and while it may be more expensive upfront, it requires far less replacement, saving time and effort in the long run.
The Use of Wood Mulch:
However, there are drawbacks to using only rock as mulch in your garden, as it can cause issues for your plants. While mulch is meant to suppress weed growth and protect plant roots, rock does little to regulate soil temperature or retain moisture. Wood mulch, on the other hand, helps shade plant roots, retain moisture, and prevent plants from drying out due to direct sunlight – in addition to improving the health of your soil as it decomposes.
Step 3: Design Layout & Installation
I was not settled on using either or when it came to rock or wood mulch, so I decided to find a way to incorporate both into my landscape design based on functionality.
Framing the Garden Beds
I chose to pull my beds out about 4 feet from the foundation of our house to allow enough space for my chosen shrubs to grow to maturity. The hydrangeas I selected for my shade garden should only grow to about 3-4 feet in width and height. This should allow plenty of space to fill in my beds without taking up too much grass space in our already narrow side yard.
When I framed the garden around my lilac tree, I chose to curve the edging further out from the house to accommodate its slightly wider width of around 6 feet.
Gardener’s Tip: It is a common horticultural practice to plant a tree far enough from a house to accommodate its mature size—allowing at least the distance of its mature canopy radius away from your house to help prevent future issues with foundations and structures.
Adding Visual Interest:
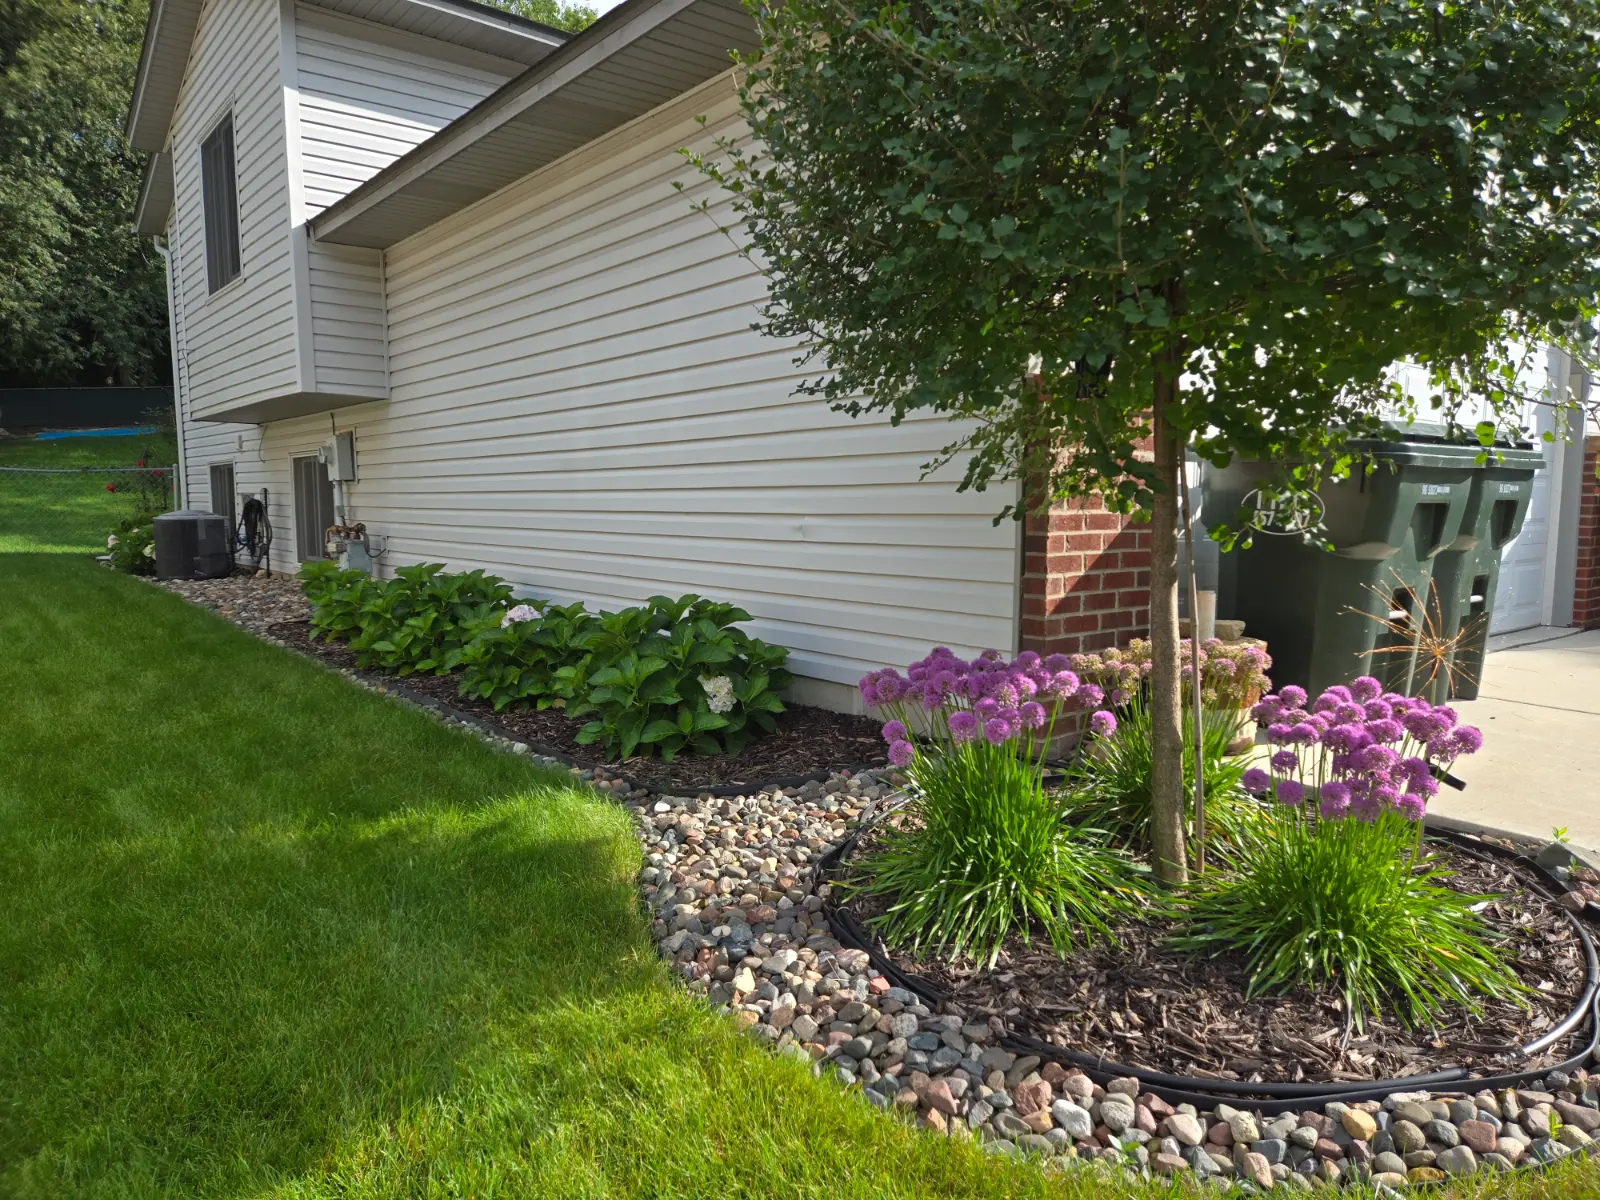
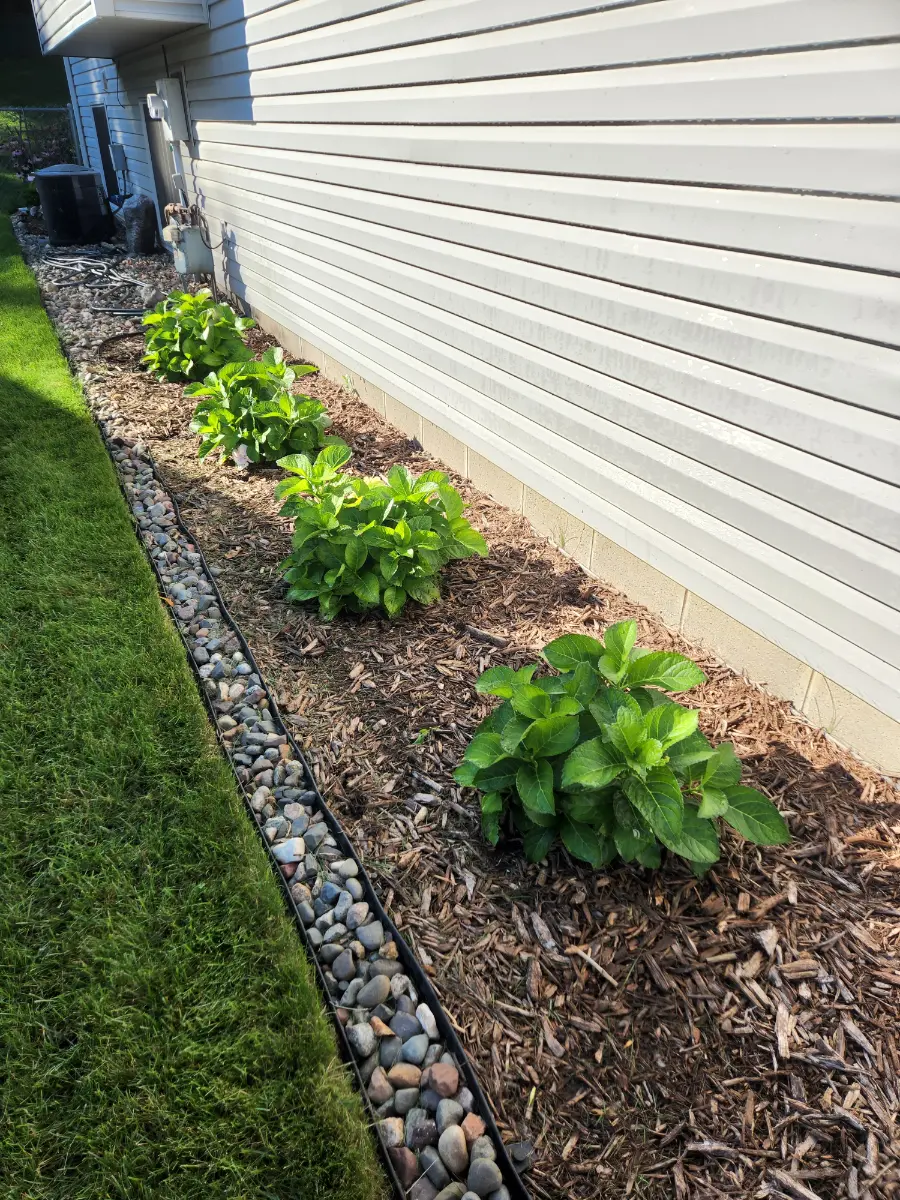
Once I determined the proper distance from the house, I wanted to provide additional aesthetics by creating layers between the river rock and wood mulch in my garden beds.
I outlined the beds with river rock, which helped keep the wood mulch from spilling onto the grass while also minimizing the amount of rock needed to fill the space.
The wood mulch was placed specifically for plant health, leaving enough room around each plant so it could reach maturity without being covered by rock.
Together, the combination of river rock and wood mulch creates a garden bed design that is both clean and functional.
Adding Water Resources
When designing your garden, it’s common for beds to be located far from an outdoor spigot, which means you’ll need alternative methods of irrigation. Depending on the garden’s location, you may need to hand-water your plants frequently, especially if they receive a lot of sun and little rain.
Alternatively, you could consider installing an irrigation system. Depending on your budget, this could be a more complex and costly system or a simpler, more budget-friendly option.
Install a DIY Drip Irrigation System:
I chose to try an above-ground landscape and garden drip watering kit from the brand Rain Bird. It was affordable and less intimidating for me to install myself in my garden beds, so I felt there was nothing to lose. It works well, but be sure to lay everything out as much as you can before cutting so you don’t end up needing too many connection pieces.
I positioned the ½” mainline tubing along the back of my beds, running from the back of the house and curving it around the dripline of my tree.
From there, you just need to connect the ¼” tubing to the mainline, making sure you leave enough length to adjust the tubing and emitters along the plant’s dripline as it matures.
Planning ahead and considering the future mature size of your plants will prevent you from needing extra tubing, which ensures a smoother flow and reduces the chance of leaks.
In Summary: What Has This Project Taught Me?
Transforming our neglected side yard taught me the importance of planning, observation, and thoughtful plant selection. I learned how crucial it is to assess site conditions—such as sun exposure, cold hardiness, and soil challenges—before choosing plants for my design.
I think incorporating both wood mulch and river rock creates a clean looking but functional, low-maintenance design that protects my plants roots as well as improves the soil they grow in.
Installing a DIY drip irrigation system is not too difficult and during install it taught me the value of planning ahead. Considering mature plant sizes helps understand the length of tubing required to ensure the ability to adjust location placement as needed.
Overall, this project showed me that even a small, overlooked space can be transformed into a visually appealing, practical, and enjoyable garden with careful design and attention to detail.
Happy Gardening!🌿