
How To Build A Flagstone Patio in Your Own Backyard
An addition to our backyard that not only solved an issue with a muddy mess, but provided us with a beautiful patio to enjoy as well.
The Backstory
One thing we did not know when purchasing our home in the Winter of 2018, was just how wet our backyard would get come Spring after all the snow melted.
Yes, of course there was the expectation we could be dealing with some aftermath of wet soil, being at the bottom of a pretty steep hill and all. However, the length of time it would take before it would dry up was not something we thought we’d encounter…
This area where it would remain wet for a long period of time just so happened to be the very area that our stairs from our deck would lead us to, and where you would need to walk if you wanted access to the rest of our backyard.
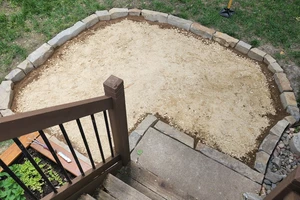
For a long while we were unable to mow this section of our lawn, and let me tell you, that grass was certainly starting to get tall. I’d try to run our lawn mower through it from time to time just to see how it’d take, but as you can see here in the middle of June when this picture was taken, we are still dealing with a wet lawn.
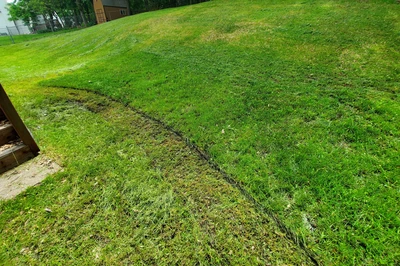
We ended up purchasing a lawn trimmer just to “cut our grass” before it got out of hand. This worked, but we really just wanted to enjoy our new backyard so we had to find a way to fix this issue we had.
Some days it was like walking through quicksand (disclaimer: I don’t actually know what quicksand feels like, but I imagine it was close enough, haha). My feet would sink into the mucky soil as I tried to get through it, and the bottom of my shoes would be caked in wet heavy mud, which would make it all that more irritating to deal with.
Since this was our first full year living in our home, we thought we’d give it some time. Maybe it was a bad season with a lot of rain. I can’t remember to be honest, but I did start researching and watching a lot of YouTube videos on how to install a french drain because we knew something had to be done eventually, and this seemed like the obvious solution.
We were new homeowners again, this time with a yard we needed to take care of, so of course we will try to solve our problem ourselves to save a buck right? Seems like it should be an easy enough DIY project.
I was all ready to do this too, after watching who knows how many hours of YouTube videos, it seemed “simple” enough so I thought sure, why not?! However, that’s how I am when I start an idea. I figure if I learn everything I can about something, I can do it myself.
Then reality struck, and I began to realize just how much would have been needed to do this correctly by sloping it appropriately, factoring in that our yard was already sloping towards the road from the backyard, so I just started to confuse myself with the math required for this part of the job. Then I started researching materials and costs, and knew we’d need additional labor to pull this off correctly. So, in the end, unless you truly know what you are doing, and you have the equipment and help to perform the job, just hire a professional. It’ll likely save you money, and most definitely time, and maybe even a headache, depending on your situation.
Now fast forward to the beginning of 2020, the year we brought our new puppy, Archie, home who was a ball of energy, and loved to play outside any chance he could get. He was still rather small by the time spring came around however even with a french drain installed, he’d still end up with muddy little paws when he’d come running up the stairs.
Then he got bigger, faster, and loved to jump off the end of the steps when running down to go outside, which of course depending on the time of year he’d create a muddy section on our lawn until things started to dry up again towards the summer months.
So what happens next you wonder? My head began to fill with ideas to prevent this issue we are facing with “still”. Although I’m sure our french drain is contributing a lot to filtering out the water more quickly, as we do see it spewing out in the road when it’s full, in the short term our issue will remain where we deal with wet soil near the end of our steps during the wet months or rainy season.
The Patio Planning Begins
As you may have learned a little about me above when I explained how we got to this point, you might already know what I’m about to share with you next as I begin the planning stages of building a patio.
Yep! You got it! (maybe;)) …I began to watch SEVERAL YouTube videos, as well as image searching ideas online for patios that people have installed to get my inspiration and understanding of what will be needed for a project like this, and I knew hiring this out was not going to be an option since we just spent $$$ having our french drain installed.
Because I like to consider DIY first, I’m fine not paying someone to do something I very well may be capable of doing myself. Also, I wanted this patio badly enough that I would put in the effort to figure it out because I knew once it was done, I’d no longer have to deal with so much mud at the bottom of our stairs.
What Kind Of Patio Do You Choose?
After watching so many others build their own DIY patios, I wondered what style of patio I could see myself building. I also questioned the cost of materials, which I started paying closer attention to when I’d make my visits to the garden center “just to look”.
What about Brick?
I started thinking I could make a small section using brick, just enough to extend the section of our cement stoop that Archie would jump over to, when leaping off the stairs. However after thinking about the process going into this, and having to ensure I had a good flat foundation to start laying brick down onto, I started to think this was not what I wanted to do.
I consider myself an imperfect perfectionist, as I like to do my best with the projects I work on and usually spend a great deal trying to make it look good, I don’t always have the necessary skill to perform certain tasks so will choose a look or style that doesn’t necessarily have to be done perfectly in order to look perfect. Hopefully that made sense. 🙂
In this case, I really didn’t want to have to get out any string and make sure the foundation was perfectly level, etc. to perform the job… I want the option to eyeball what I’m doing sometimes, haha.
With brick, I felt in order for this to look right, I’d need to do everything perfectly. I didn’t completely knock the idea right away though, as I did make my trips to Home Depot to check out prices, and style options. In the end, I wanted something more natural looking.
Why Not Concrete?
I figured I’d include this idea to the mix since it was brought up as another option when discussing the idea of what type of patio to build at the bottom of our stairs. It would have likely been a lot less expensive and would solve the issue at hand. However, as mentioned above, I just didn’t have it in me to want to deal with the effort to make it look perfectly level and smooth.
Also I strongly believe we would have ended up with cracks in the concrete eventually with the ground shifting during the seasons freeze and thaw cycles, and it wasn’t the look I was going for.
Flagstone it is!
Not only does flagstone look great no matter where it is, and how it’s used, it provides you the flexibility of making your project imperfect, and still look great. Another bonus is if you have yourself a landscape supply company nearby where you can buy a pallet of flagstone like we do, it’s much more affordable, in my opinion.

This is what remained of our pallet after filling our truck, but we ended up coming back for the rest of it to complete another project I had in mind which was to create a flagstone path from the back gate door to our new patio.
We had already been purchasing our river rock and mulch through this company, so when we explored the flagstone options, I was itching to get started right away.
I was happy to finally have found something that we were ready to move forward with. However, now that we know what we want to use, how do you begin?
How To Install a Flagstone Patio:
Now that you know what materials you want to build a patio with, where do you begin? If this is a first time for you too it can be hard to see the end result. I like to begin all my projects, if I’m able, by marking up the area with visual cues to help me see the picture more clearly in my head. Somehow when I see a layout in front of me, my imagination steps in, and I can see what things might look like.
Spray Paint Helps Visualize
I have always found it helpful to visualize my plans by grabbing a can of spray paint, and marking out where I want things to be. When you begin to mark up the layout, and step back, you will find yourself making tweaks to your design ahead of time which for me, saves time.
You will be able to see if you prefer straight edges over curved ones. It will allow you to decide the shape of your patio, maybe you want it larger than originally intended.
I started with a tape measure to determine the size I wanted at first, and later began to mark up the grass based on those measurements. I found out that I liked a more curved look, and I also made it larger than originally planned because I was trying to think ahead on what I’d like to do with the space.
Rip Out the Turf
This has to be my least favorite part of landscaping. If you have an area of your lawn and do not have the patience or time to lay down cardboard to kill the grass, you will need to rip up the grass yourself.
I will warn you, it’s a great deal of work if you have thick grass. Thankfully I wasn’t dealing with too much of it in this area at the time, but I do want to share this link to a garden tool that has come in handy for me for several of my landscaping projects. It’s a Steel Landscape Edger and it makes shaping your border and cutting into grass roots so much easier. Alternatively you could use a shovel, but the teeth on the edger is what will make this job less difficult.
Keep in mind too, if you are like me and could use the grass you remove from one project, to fill a space in your lawn that has exposed dirt or maybe a dip in your yard, having an edger with teeth will help you cut deeping under the turf to pull up a decent strip of grass. I’ve been doing this around my lawn, and it has worked very well. Just remember to water those strips and step on them enough to make good ground contact with the soil.
Time to Start Digging
It is always best to call ahead before you start digging into your dirt, and regardless of the area being marked by your city, if you are new to the property, it doesn’t hurt to still be cautious when you push your shovel down into the dirt. You will either run into plenty of rocks, or potentially unmarked cables like me.
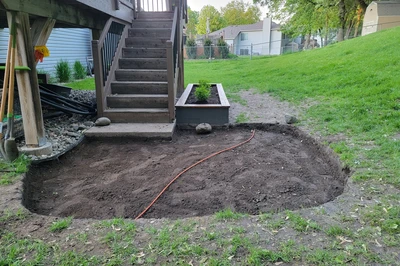
I knew from earlier projects that we had a cable running all the way around our home that the prior owner installed, likely a satellite cable we thought. Fortunately, I found this again while shoveling dirt away at a slight angle, and not sticking it straight into the ground. I was playing it cautious because I suspected a cable would be in this area, based on where I spotted this cable during other projects.
Making Layers
You will need to start digging deep enough, around 6-7″ to allow you enough depth to provide a solid base for your patio.
Keep in mind what material you are using to build your patio, as you need to factor in the depth of your rock, brick, or whatever you are adding to the top. In my case the slabs of flagstone were roughly the same, but some of the thinner slabs we’d simply add more sand to raise them up with the rest.
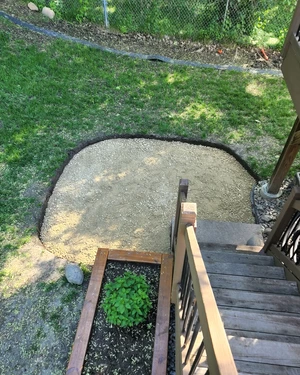
Crushed Rock (Class 5 Gravel):
Your first layer should be to add a couple inches of Class 5 gravel. This will help with drainage and provide a stable base. We filled the bed of my husband’s F150, and that was enough for this space of about roughly 100 square feet (+).
Note: if you are unsure how to get your square footage, just take the length x width of your area to get the square footage for your project.
In between each layer, don’t forget to tamp down your rock or sand. This will make sure you have a solid layer without loose areas that may shift or weaken your flagstone slabs later. If you don’t already own a tamper or know of someone that does, you will want to pick this up prior to starting your project. Here is a link to a Steel Tamper that will be required for a project like this.
Sand
Our next layer was sand, which this time we just picked up bags of it from Home Depot since I think they were running us about $3-4 per bag at the time. Here is the sand we had been using, called Paver Sand.
This worked well for us, and was fairly inexpensive. I can’t recall how many bags we used, but I think we might have purchased around 6-8 bags.
We too needed to make sure to add our edging before adding too much of the sand so we could ensure we had a good frame for our patio.
Flagstone
This portion of the project is definitely a two person task, as some of these large slabs were incredibly heavy! They don’t appear this way at first, but just wait until you experience this for yourselves. I find projects like this an incredible workout. Don’t forget to lift with your legs! 😉
The tricky part of this next step is finding out how everything will piece together. I still have no idea how we got some of these pieces to align so well, but there was quite a bit of rearranging. Don’t jump into this part right away. You might need to lay some out, sit on it for a bit, and do some more rearranging.
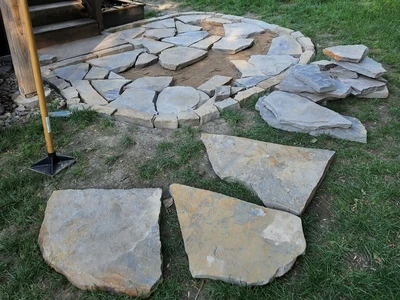
We started with several of the larger pieces around the outside, although I think the “rule” is to start in the middle and work your way out. This is where I remind you that I’m not perfect. I go with what works for me, and I believe this turned out quite beautifully.
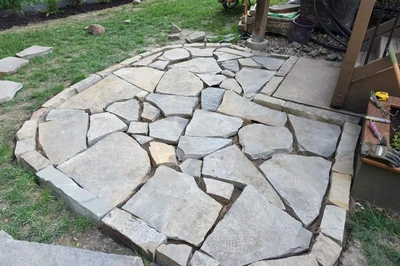
Crushed Granite
The last step to complete this project was to add in the crushed granite. We chose this over small pebble rock, or another product I’ve recently learned about that is made of polymeric sand that you simply brush into the cracks while wet and allow it to harden, which will help bond the pavers together, and prevent weed growth.
Although I do like the look of having a sand like appearance in between these pavers, the crushed gravel pairs well with the flagstone, and allows this area of our yard to shift without any issue with cracking. Plus unlike pebble rock (so I’ve heard), the crushed granite doesn’t move around as much. I have had very few instances where too much of it has escaped from the patio area and ended up in the grass. In the fall I have taken the leaf blower at this, and the rocks will barely move. Just a few will fly out, but easy enough to see and throw back in.
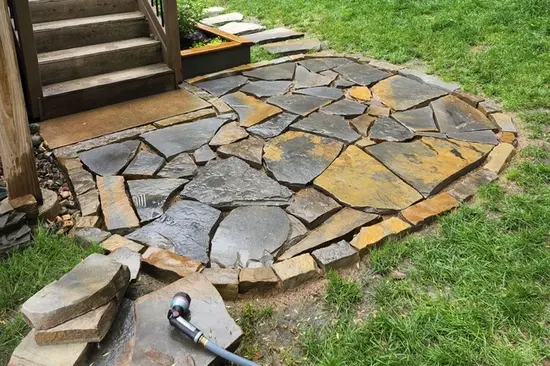
Final Result
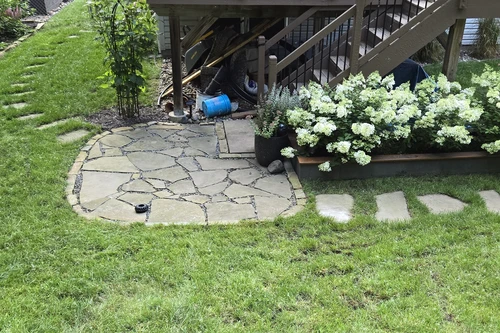
I’m very pleased with how this patio turned out, and although not a cheap project, as it was around $1000+ for all the materials, based on the receipts I kept, it most certainly was less expensive doing the work ourselves.
We no longer have to deal with walking down the steps into soft wet soil after a good rain, or during the spring while the dirt is still waiting to dry up. We can even enjoy a fire for two on a nice summer’s night.

Although this is a perfectly good sized patio for two, I am already dreaming up my next project to add a firepit area on the top of our hill that will seat at least 6. I’ve already begun the layout, and this season will begin to dig into the hill to start leveling out an area for seating, but ideas are still stewing so come back later if you want to see that project, and how I built it.
Thank you for reading, and I hope I was able to share enough with you from my own experience that will give you a good start with your own patio DIY.
If you like what you see, or learned anything, please tell me about it by commenting down below!
Happy Gardening!🌿