
How to Build Functional Raised Garden Beds
Interested in growing a vegetable garden this year? Check out my garden bed I’ve designed that will grow food but also serves a purpose by adding a privacy panel to the back.

Now that it’s spring, you might be thinking to yourself, should I try starting a vegetable garden this year? If you are just getting started, or maybe this is not your first year gardening, but you’ve been dreaming up different ways to change up your garden, I’d like to share my raised garden bed idea with you.
My raised beds were originally planned up to prevent some invasive vines against my neighbor’s fence, which you can read about on my post Building Raised Garden Beds to Fix a Problem with Invasive Grape Vines. However I have always wanted to grow a vegetable garden, and this was one of our best (possibly only) options in our yard to add a garden.
Planning Ahead
If you are coming across my post too late in the growing season, try to make this garden bed a goal of yours to plant your vegetables in, next spring. Reason I say this is because building beds can take time and when the clock is ticking you don’t want to miss out on getting plants in the dirt, especially since our growing season is so short here in Minnesota. No need to lose out by waiting to gather your supplies and build your beds.
Temporary Garden Ideas
You can make a temporary bed, like I did, and have just as much fun this year while you begin your real planning for next spring.
One day I decided to grab a couple 2×4’s in our garage and cut them enough to build a frame with the length I had available. These were nothing special, and were simply built because I had the itch to grow some vegetables, but I knew I wouldn’t be able to get my true raised beds built for a while yet.
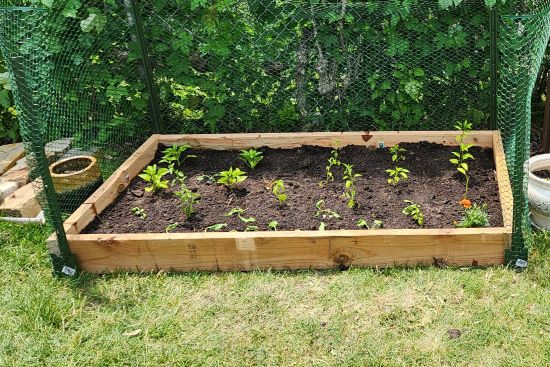
Honestly, garden beds really don’t need to be anything special, since plants just need some good soil and sun anyway. I just ended up tossing in a couple bags of quality dirt over my existing soil, and added starter plants that I picked up from a local garden center.
Temporary Beds Provide A Great Trial Period
This worked great, and truthfully, planting in this temporary bed allowed me to gauge the amount of sun I would receive, where I planned to build my actual raised beds later that year.
When it came time to build our beds in this very spot I had been growing my temporary garden, I had to dig out all my plants and move them elsewhere. I wasn’t sure where this could be, but I noticed we had this broken wheelbarrow that we haven’t thrown out yet, so figured I could just move my plants to this for a bit.
This held all of my pepper plants very well, and because I had full expectations that it wouldn’t be long before I’d transplant them back to my newly built beds, I wasn’t worried about their growing conditions in this small space.
Well plans change, as they often do, so my peppers did remain in this broken wheelbarrow for the remainder of the growing season.
Sharing this with you, because I’ve learned that this too is another option if you have something similar that can hold dirt. My plants did very well in this shallow filled broken wheelbarrow in a semi sunny location.


It’s odd to me sometimes how things just seem to work out. I was picking banana peppers, jalapenos, and a couple bell peppers at the end of the season from this little garden I created. Not a crazy amount of peppers, but I was so excited every time I’d go outside to check how they were doing, I knew then and there that gardening was for me.
My Process Before Building Raised Beds
It started out with me measuring the area I had available so I could determine the size of beds I’d like to build. Because these beds would be next to my neighbor’s fence, I wanted to make sure I allowed enough space between the back of my beds and the fence for yearly maintenance. After all, I need to get back there to trim all the growth that occurred that year.
Measure Before You Build
Please make this a priority of yours before you begin any project, because it will truly help you figure out how much material you need to buy, and how much room you can work with.
When you really begin to measure the area you will start to think several steps ahead and may be able to catch possible flaws or other things you want to change in your design before you start to buy your materials and build your beds.
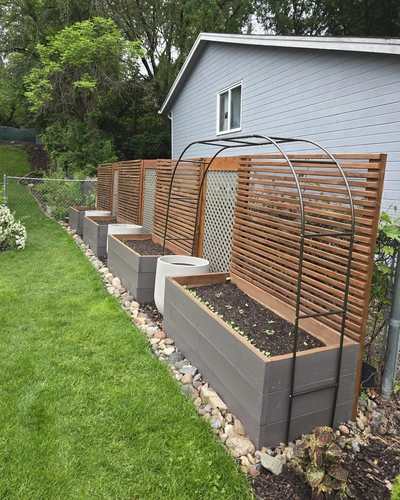
During my process, I will begin to mark the area for each bed in my lawn. I even changed it a handful of times before I ended with what I have today. I knew I didn’t want to build a bed right up next to our backyard fence, so I left a good amount of space before the first bed. I thought this could be a good area to store pots, or for a bit of time, our yard bin. Either way, I left this available for whatever I might find useful for this space.
I also knew I didn’t want my beds to go much beyond our neighbors fence, so I thought lining it up with that would look much nicer overall. Especially since their vines would fill in the fence and they wouldn’t have the back of my beds to look at.
Now that I had the location for my outside beds figured out, I was able to see where the remaining two beds would go, and how much room in between each bed I would have.
Consider Bed Access When Choosing Your Dimensions
As mentioned above I plan to build my beds with enough space between the back of the bed and the fence, so this removes some of the room available to me between the side of my house and front of the raised bed. I needed room to allow a comfortable walking space in between, so I chose not to build my beds too wide from front to back.
Width:
Think about how little you want to strain your back when having to reach into your bed to access your plants. Most often you will read others providing a recommended width of around 2 feet around your bed. This should provide you with a good reach without having to bend over into your garden too much, which the comfort aspect is one of the reasons to grow in raised beds anyway.
Depth:
Another measurement to consider is how deep you want your beds, or another way of looking at this is how tall you want your bed to be. Beds can either be ground up, or you could build it with legs, which would certainly keep you from having to fill so much of it with dirt or other yard materials if you chose to layer the bottom first before adding in the soil.
The lovely thing about building your own raised beds is being able to scale it to you specifically. I based my bed design on what I would personally find comfortable for me, but I also took into consideration the wood dimensions when I was deciding how much lumber I’d need to buy. I try to consider my budget when I come up with projects like this, and felt an added layer to make my beds taller wasn’t necessary.
Length:
Now if it were up to me, the more room to grow vegetables the better! However… of course I needed to give myself an easy way to get in between my beds for the aforementioned yearly maintenance that had to be done still.
Because I had around 30 feet to play with and I wanted a comfortable enough distance between each of the beds, I decided to space them 2-3 feet apart, which by doing so would allow me to build four beds that were 5 feet in length.
Plan Out Your Shopping List
Before I bought all of my materials for this project, I planned out what I would all need by searching online and adding everything I believed I needed into my cart.
Print It Out
This not only allowed me to see how much this project could end up costing me, but It was super helpful once I got to the store, as I brought a print out that I marked with the isles on so I knew where I needed to go once I got there.
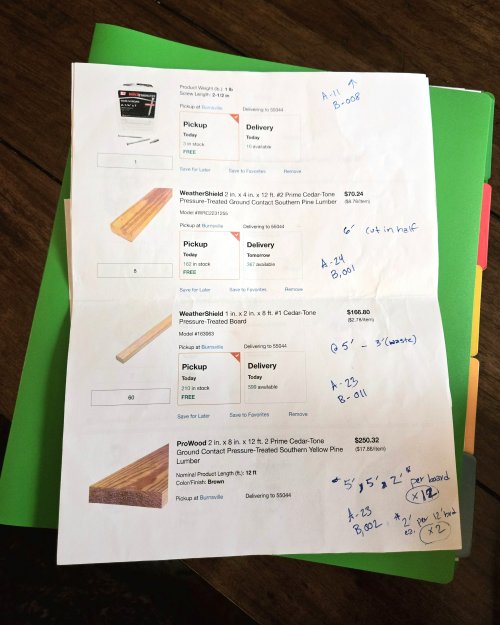
I don’t know if you’re like me, but for projects like this that I’m not familiar with, I get overwhelmed and will forget something, or it will take me forever and a day to find it. It also included the pictures of each item I needed, so I could pick it out much more quickly too.
Take Notes
Another thing I chose to do and mentioned previously, is to find the lumber lengths that would allow me to get most use from. I knew the width and length of my beds, so I simply tried to see how many cuts from a single board I could get.
Once I figured out the best length to give me the most use, I chose to add that length board to my shopping cart, and determined how many boards I would need. I suggest taking very good notes (or sketch this out) while you are figuring out how many boards you will need, as it can get very confusing once you go back to reference all the lengths from each board.
Concerns Around Pressure Treated Wood
You will notice that I chose to go with pressure-treated wood to build my beds as I believed this would provide me the longest life during our winter seasons, however I know there are a lot of gardeners growing organically today where this would raise concern.
If you are concerned about chemicals leaching into your soil I have seen people choose to char their wood for similar protection so they can purchase non-treated wood (alternatively you can choose the more costly cedar or redwood). Another option is adding a fabric barrier between the wood and soil like I had done. This isn’t perfect, but I mainly chose to add this to keep from any dirt seeping through the wood if it happened to shrink.
Note: When purchasing treated wood, I suggest letting it sit for a few days to dry out if they still seem wet. I also stacked my boards to keep weight on them to hopefully keep them from warping.
Although the wood I chose is pressure-treated, it was treated with the chemical ‘MCA’ according to Home Depot’s website. This chemical is known as Micronized Copper Azole, which is considered safe for vegetable gardens. Even though it may still leach some copper into the soil, it should not be significant enough to be absorbed by your plants.
My Shopping List:
Take Advantage Of The Free Services
I’m not sure about all home improvement stores, but one reason I love going to Home Depot for these types of projects is that they will cut your wood to your specified lengths. At least they have during the times I’ve been there. It can be hit or miss however, and sometimes it depends on who is available to help. I suggest going earlier in the day, and flag someone down to ask if there is anyone that can help.
Be Prepared
I do suggest coming prepared however, so that when you find someone that can help you, you can easily relay to them what you need. Thankfully I thought about this before heading to the store, so I had my cutting lengths all written down and was able to share this with them while they were grabbing the boards from my cart.
This too makes it easier for transporting back home. These boards can be incredibly long, and even with a truck it would not have been possible without them being cut before leaving the store.
Reminder During Checkout
Just remember to face the barcodes all near each other because the individual that has to check you out will be very confused by how much lumber needs to be charged since it appears like you have more than you actually have. This again is where it is helpful to have a print out to easily share with them the number of cut boards you have, and also to ensure you are charged appropriately.
How To Build These Raised Beds
Because you will likely be working with your own measurements based upon your personal needs for your own raised beds, I’m not going to break this down into my exact measurements.
I do believe you will gain enough knowledge on how I built my beds, to be able to turn this around and build your own beds to your desired measurements, by following the general design of my beds and planning ahead, like explained above.
Start With Your Base
After you return home and have all of your materials available, you can start piecing your beds together. Now that you already have all your boards cut to size, it will be a breeze moving right along.
Group Your Boards By Length
I suggest organizing all of your boards together in piles based on the length so you can ensure you have all the correct pieces, and will not have to make any correction cuts at home. You will likely have a few stragglers that don’t belong in the project and were leftover cuts that you will not need, and might grab by mistake if you had not already grouped everything together.
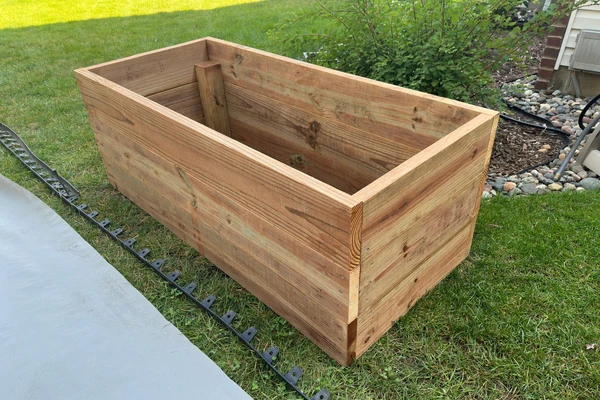
Start Framing Your Base
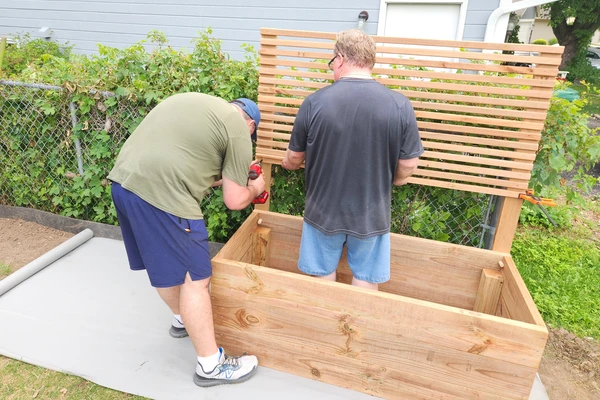
Take your two front and back as well as width length boards and line them up in the shape of your bed. You will then grab your 4×4 corner posts, which will be your support boards, and what each outside board will be screwed into – making sure the first row is level. I do wish I had taken a picture of this part, but it escaped me as I was either holding the boards together or clearing out the area of our yard to place the finished beds.
I chose to keep the 4×4 corner post a bit shorter than the overall height of the bed because I didn’t want it showing up once I filled the beds with dirt. Just make sure it’s tall enough to screw the top board into.
Once you have screwed in each board to the height you wanted, you can begin on the next garden bed as the privacy panel will come later.
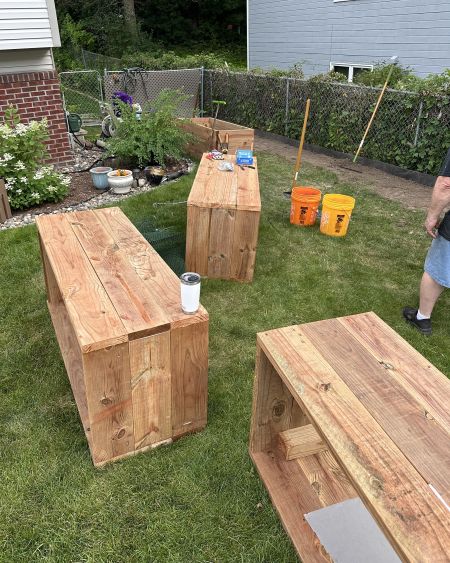
Consider Additional Support
If your beds were longer than 5 feet, you may want to consider including another board in the center front and back for additional structure, but the boards I bought were pretty solid already so I was not worried about them warping once filled with dirt.
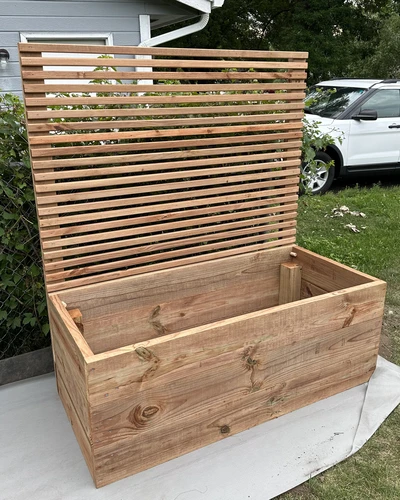
At this point it might look like you just built a bunch of coffins, haha. That was my very thought when we were moving them to our front yard for placement alongside the fence. Don’t worry though, it will look better once you fill it with plants. 🙂
Incorporate a Privacy Panel (or Garden Bed Trellis)
Normally when I think of raised beds, I don’t think about adding a privacy panel or permanent trellis on the back because if you have a spot to place them and access them from all around, there is no need for this.
However my beds were serving multiple purposes, and I needed to incorporate a back panel so I could prevent my neighbors’ vines from growing into my beds. I thought the look of these smaller wood slats would look nice and cover enough of the view from behind the beds, so I chose to go with this look.
Add 2×4 Vertical Supports
For this addition, you will simply tip the bed forward and screw in a couple 2×4’s at the height you want your back panel to be.
I chose to go with a height of 5 ½ feet because I didn’t want to run into any issue with this being considered a “fence”, which I believe you are not able to install at 6 feet. Besides, this height was just enough to keep from seeing most of the vines peaking above.
Once you have your 2×4’s secure, you can start screwing in the wood slats.
Note: Consider the lengths of the screws you need for your project because you don’t want to use the same screws you used on the raised beds as they are likely much longer and would pass through to the back of your privacy panel. Make sure when picking out your screws, that they aren’t too short or too long. You can always base this off the depth of the wood you will be working with.
How to Evenly Space the Wood Slats
Spacing your 1×2 wood slats was a little more of a challenge, and when I had my Dad here to help, we were moving a lot faster with the three of us. However what we did was grabbed an extra slat of wood on the flat side, we stuck it between each section to get the same distance and screwed them into the 2×4 from there.
Alternatively, if you have any Trigger Clamps this was incredibly useful during this step of the project to secure the wood slat on one end as you screw in the other.
Include the Mesh Screen (If Needed)
Once you have your back panel built, you can now staple on your mesh screen if you need to prevent anything from growing through your wood slats. This is much easier to do before you fill your beds with dirt since we could just tip the bed forward again, and stretch the screen over the back and start stapling it into the 2×4 on the back. I chose to keep the top and bottom alone so that whatever may fall into the back can easily be removed without getting stuck in between.
Stain Or Paint Your Beds
Now that your beds are fully built and ready to be filled with dirt, you can choose whether or not you want to add some color or maybe even additional protection by staining the outside of the beds.
I chose to stain the bottom of the bed the same color I have used on another bed of mine in the backyard, which was made of concrete blocks. You can read more about that under my post 5 Steps to Build a Budget Friendly Raised Bed Using Concrete Blocks if you are interested.
To stain your back panel, I would strongly suggest getting yourself this Stain Pad Applicator because it made my life so much easier when trying to get enough coverage on each wood slat. This thing made this part of the project so much faster and smoother over trying to use a normal stain brush which I can picture dripping stain everywhere.

I also used this for the base of the bed which was fairly quick as well, but a little trickier near the bottom of the beds as I’d get too close to the ground at times, but not an issue at all since this is just outdoor beds after all.
Time To Start Growing!
Now that the beds are built and ready to go, all that is needed now is to start filling your beds with dirt and add some plants.
I took awhile to do this only because I wanted to fill my beds with dirt from another project I’m working on that would give me plenty of dirt to use. I started off by adding sticks, leaves, and grass clippings for the remainder of the season, which would all get very packed down after winter, leaving plenty of bed to fill yet.
Once I was able to start adding in dirt from our backyard, I filled it a bit over half full, leaving enough room to add in bags of really good soil and compost to mix in with my existing dirt. I knew my free dirt had a lot of clay in it, and I wanted something to help with drainage and reduce the clumpy-ness so my seeds had a good chance to take root once I began to plant.
I hope I have been able to share enough with you from my own personal experience, that will give you plenty to base your own project off of, and allow you to build the raised beds that will work best for you!
Thank you for taking the time to read my story, and if you have any comments to share down below, I’d love to hear them.
Happy Gardening!🌿